
QRCode Integration
This mode is built for PC checkout flows: the merchant renders the qrCode returned by createPayment on the desktop page, and the buyer scans it with a mobile wallet (or their phone camera) which then opens the right wallet app to complete the payment.
| Aspect | Notes |
|---|---|
| UX | Good |
| Effort | Low (just render a base64 image) |
| Platforms | Web (PC) |
Interaction
On a PC order page, the merchant renders the qrCode returned by createPayment; the buyer scans it with a mobile wallet (or phone camera) to complete the payment.
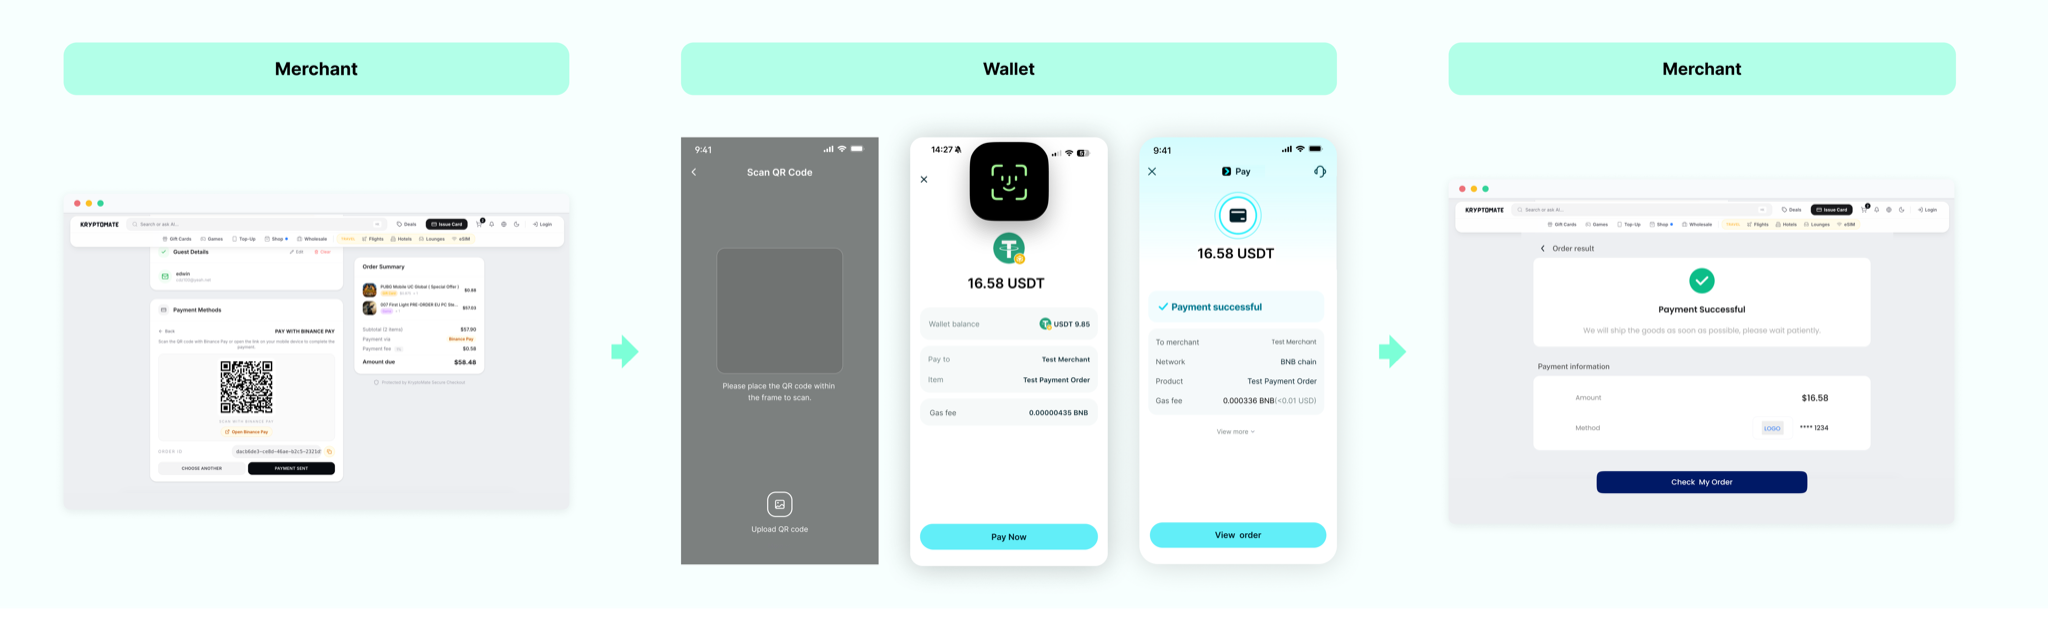
Differences vs. CKP / Deeplink
All three modes share the same POST /payin/v1/createPayment endpoint and differ only in how the client guides the user:
| Stage | CKP | Deeplink | QRCode |
|---|---|---|---|
| Client medium | Browser jumps to httplink | Browser jumps to deeplink | Browser renders the qrCode |
| Target device | Mobile WAP / App | Mobile WAP / App | Desktop Web |
| User action | Click → redirect | Pick wallet → redirect | Scan with phone |
Steps 0 / 1 / 3 / 4 / 5 reuse the CKP integration guide. This page only covers the field constraints in step 1 and the QR rendering in step 2 that are specific to QRCode.
Prerequisites
- KYC completed with
x-api-key/x-api-secret(available under merchant Portal - Developer Center); - Server-side SDK installed;
- A PC checkout page that can render a base64 image.
Integration steps
Sequence
Step 1 — Create order (wallet + chain required)
Call POST /payin/v1/createPayment. In QRCode mode you must specify the wallet and chain so Paydify can build the right scannable payload:
| Field | Required | Description |
|---|---|---|
payMethod1 | Yes (QRCode only) | Wallet identifier — see Supported chains and currencies |
payMethod2 | Yes (QRCode only) | Chain |
| Other fields | — | Identical to CKP — see CKP integration — Step 1 |
Request example:
{
  "mchTxnId": "MCH_TXN_20260610_002",
  "txnAmount": "0.01",
  "currency": "USDT",
  "checkoutMode": "MERCHANT",
  "payMethod1": "BINANCE",
  "payMethod2": "BNB",
  "notificationUrl": "https://your-domain.com/api/payment/notify",
  "successReturnUrl": "https://your-domain.com/pay/success",
  "failReturnUrl": "https://your-domain.com/pay/fail",
  "pendingReturnUrl": "https://your-domain.com/pay/pending",
  "txnTitle": "Test Payment Order",
  "source": "web",
  "txnDesc": "Payment for test product",
  "accountInfo": [
    {
      "toAddress": "0x1111111111222222222233333333334444444444",
      "network": "ETH"
    }
  ],
  "payerInfo": {
    "uid": "USER_123456"
  },
  "mchExtInfo": "{\"orderId\":\"ORD_2025081201\",\"productId\":\"PROD_001\"}"
}
Response example:
{
  "code": "SYS_SUCCESS",
  "message": null,
  "messageDetail": null,
  "data": {
    "txnId": "P5118170010653393152",
    "mchTxnId": "MCH_TXN_20260610_002",
    "httplink": "https://app.binance.com/payment/secpay?linkToken=xxxxxxxxxxxxxxxxxxxxxxxxxxxxxxxx&_dp=Ym5jOi8vYXBwLmJpbmFuY2UuY29tL3BheW1lbnQvc2VjcGF5P3RlbXBUb2tlbj14eHh4eHh4eHh4eHh4eHh4eHh4eHh4eHh4eHh4eHh4eCZyZXR1cm5MaW5rPWh0dHBzOi8veW91ci1kb21haW4uY29tL3BheS9zdWNjZXNz",
    "deeplink": "bnc://app.binance.com/payment/secpay?tempToken=xxxxxxxxxxxxxxxxxxxxxxxxxxxxxxxx&returnLink=https://your-domain.com/pay/success",
    "qrCode": "data:image/png;base64,iVBORw0KGgoAAAANSU...",
    "state": "INIT",
    "errorMsg": ""
  },
  "success": true
}
In QRCode mode you mainly consume data.qrCode.
Step 2 — Render the QR on the checkout page
data.qrCode is a data:image/png;base64,... Data URL — you can use it directly as an <img> src:
<div class="checkout-qrcode">
  <p>Scan with the Binance app to pay</p>
  <img src="{{qrCode}}" alt="Paydify payment QR" width="240" height="240" />
  <p>Order: {{mchTxnId}}</p>
</div>
Live status refresh
Once the QR is rendered, the checkout page must poll the order so the user sees feedback in real time:
const pollPaymentStatus = async (txnId) => {
  while (true) {
    const { data } = await fetch('/your-backend/getPaymentStatus', {
      method: 'POST',
      body: JSON.stringify({ txnId })
    }).then(r => r.json());

    if (['PAID', 'FAILED', 'TIMEOUT'].includes(data.state)) {
      return data.state; // redirect to the corresponding result page
    }

    await new Promise(r => setTimeout(r, 3000)); // poll every 3s
  }
};
Key constraints:
- A 3–5 second poll interval is a good default — anything tighter just stresses the API;
- Keep the webhook channel as the source of truth — polling is only for refreshing the UI. The order state ultimately comes from the webhook (see Step 3 belt-and-braces);
- The QR has its own expiry (default 30 minutes, controlled by
lifetime). Surface a countdown to the user and offer a "refresh / re-order" path when it elapses; - Ask users not to close the checkout page before the wallet finishes — so the page can land on the final state immediately.
Reuse from CKP
- Step 0 — Sign / verify — identical, see CKP integration — Step 0;
- Step 3 — Result acquisition — same belt-and-braces (webhook + active query), see CKP integration — Step 3 and Webhook;
- Step 4 — Refund — identical, see Create refund;
- Step 5 — Settlement files — identical, see Get settlement files.
Extra go-live checklist
[ ] QR scan-rate verified at typical PC / laptop resolutions
[ ] Countdown timer + order number rendered next to the QR
[ ] 3–5s polling of getPaymentStatus implemented; terminal state navigates immediately
[ ] Webhook + polling belt-and-braces wired up, with webhook as the source of truth
[ ] Sandbox device test of at least one mainstream wallet QR scan is green